自製音頻解碼之路(2)
23 Mar 2024
本文僅為介紹,並非作業指引。內容涉及高電壓、高電流等危險工作,請遵照當地法規同安全指引執行。除非閣下為專業人士,否則不建議進行任何操作。所有、任何後果自負。
Legal-Disclaimer
This site is meant for informational purposes only! To better your knowledge on the concepts of electricity, electrical circuitry, entertainment component circuitry and all other wiring methods. DO NOT ATTEMPT ANY WIRING OF ANY KIND if you lack the knowledge and understanding required. Otherwise personal injury and/or death as well as property damage or loss could occur.
WARNING
Electricity is dangerous and can cause personal injury or DEATH as well as other property loss or damage if not used or constructed properly. If you have any doubts what so ever about performing do-it-yourself electrical work, PLEASE do the smart thing and hire a QUALIFIED SPECIALIST to perform the work for you.
NEVER WORK WITH LIVE VOLTAGE. Always disconnect the power source before working with electrical circuits.
When performing electrical work, ALWAYS READ AND FOLLOW THE MANUFACTURERS INSTRUCTIONS AND SAFETY GUIDELINES. Always follow your local electrical code and requirements which are specific to local areas.
By utilizing this site and the information given, YOU are expressly holding “soyee.me” HARMLESS FOR ANY PROPERTY DAMAGE, PERSONAL INJURY AND/OR DEATH, OR ANY OTHER LOSS OR DAMAGE THAT MAY RESULT FROM YOUR ACTIONS.
This information is provided for the use of individuals as they see fit! soyee.me and all parties associated with it are not responsible for the use and results of this information by any party, especially those lacking sufficient skill or knowledge to perform these steps safely and ANY HAZARD CREATED IS THE SOLE RESPONSIBILITY OF THE USER.
Ian Canada DIY Project
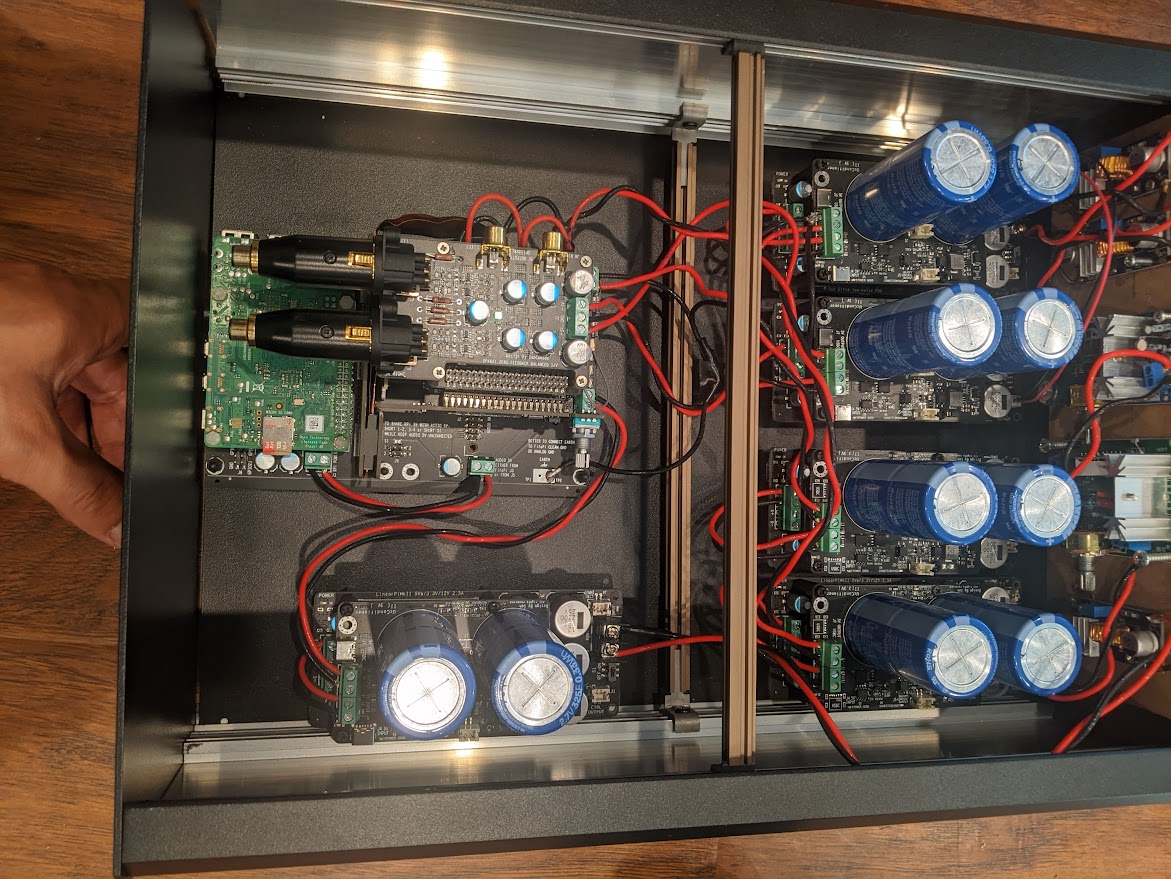
DIY Audio社區卧虎藏龍,包括Pass Labs創辦人Nelson Pass都係活躍會員。Ian Canada DIY Project係上邊DAC區頗受歡迎嘅項目,之前以FifoPi出色嘅表現而廣受關注。宜家開發嘅產品涵蓋Streamer, DAC, DDC, PSU及時鐘等等,而且幾乎可以獨立使用。配合Pi或脱離Pi使用都得。本次講解嘅係配合Raspberry Pi 4B搭建嘅 串流解碼。開始前,略略提下設計要求:
- 每部份獨立供電
- 1U機箱容量(容易入架)
- 長時間聆聽(4-5個鐘)
Parts嘅List
- 1D FifoPi Q7II
- 4B ES9038Q2M Dual Mono II DAC
- 6B OPA861 Zero feedback balanced I/V
- 35C StationPi SMT
- 49B MonitorPi Pro
- 80A & 80 B SC-Pure Extremely-low Phase Noise Audio Clock
- 32B LinearPi 共5個
- 25C & 26C UcConditioner 3.3V(2個)、5V(3個)
- 50A GPIO extension KIT4.
- 50B GPIP spacer
- etc
如果輸入界面要埋RCA, OPT, I2S over HDMI就加個
- 19D ReceiverPi
如果要USB輸入(支持PCM、DSD更高碼率)就加
- 70B Amanero Combo384
如果升級成UcPureMkIII,用超級電容供電會更好。呢個要視乎個人系統同埋筆直了。
砌機注意
砌OPA861 V/I嘅供電要用以下方法:

Raspberry Pi儘量隔離,但係吾好造成短路!

系統選擇
吾用Roon嘅朋友隨意。 用Roon嘅朋友,Raspberry Pi儘量作為Endpoint。個人測試目前較好嘅係 Silent Angel 嘅 VitOS ,以直連方式傳輸。
- 用Raspberry Pi Imaginer 刷入Raspberry Pi OS for Pi4。
- 成功啓動後,將 根目錄 下邊16個 .DAT、.ELF 文件,抄落備用。
- 刷入VitOS,上電,等10分鐘左右。呢個時候其實係啓動吾到。斷電,掹卡。
- 將16個DAT、ELF文件抄落VitOS根目錄。入卡,畀電。得咗。VitOS Manager見到Raspberry Pi 4。
- Windows用家,用PuTTY軟體SSH登錄VitOS後台。
pacman -Syu git gcc autoconf libtool libdaemon libconfig
update下。再:
pacman -Syu vi nano
裝編輯軟體。在 /boot/config.txt 裡貼上如下幾行就好,然後重開機。
# AUDIO HAT

dtoverlay=i-sabre-Q2M
force_eeprom_read=0
如果想降頻減少熱量,且讓頻率穩定,聲音也會比較穩定:
# REDUCE FREQ
force_turbo=1
arm_freq=600
arm_freq_min=600
gpu_freq=150
core_freq=200
core_freq_min=200
h264_freq=200
isp_freq=200
v3d_freq=200
sdram_freq=300
sdram_freq_min=300
avoid_pwm_pll=1
over_voltage=-8
over_voltage_min=-8
over_voltage_sdram=-8
over_voltage_sdram_c=-8
over_voltage_sdram_i=-8
over_voltage_sdram_p=-8
如果想關掉,所有樹莓派的LED燈:
# DISABLE LED
dtoverlay=act-led
dtparam=act_led_trigger=none
dtparam=act_led_activelow=off
dtparam=pwr_led_trigger=none
dtparam=pwr_led_activelow=off
dtparam=eth_led0=4
dtparam=eth_led1=4
VitOS默認關掉了WIFI同藍牙,以下係以防其它系統需要:
# DIAABLE WIFI/BT
dtoverlay=disable-bt
dtoverlay=disable-wifi
系統直連
只推薦VitOS,因為人哋已經吾再update。Roon Bridge亦冇再update。 同樣SSH係後台,
ip link
睇睇用緊嘅Ethernet端口,例如:
enp0s25
wlp3s0
記低。然後編輯創建一個profile:
/etc/systemd/network/eth0.network
[Match]
Name=eth0

[Network]
Address=192.168.100.199/24
Netmask=255.255.255.0
Gateway=192.168.100.1
DNS=1.1.1.1
DNS=8.8.8.8
eth0 因應個人結果而改。上邊所有嘅字串因應個人需要而改,就返 Roon Server 直連端口嘅同一網段。 激活、啓動服務:
systemctl enable systemd-networkd
systemctl start systemd-networkd
systemctl enable systemd-resolved
systemctl start systemd-resolved
搞掂!